DIY Gravity Feed Station
OR My lazy way to free feeding for the girls
This is a quick drawing mock up of the feed bin I planned to build by recycling a water pressure tank that we had left over after changing out our whole house water system. It holds about 20 plus gallons of water, I am hoping at least 2 bags of feed. It has one opening at one end, and two mounting options, though it turns out I had to go with the hanging mount on the right but that will be explained later in the post.
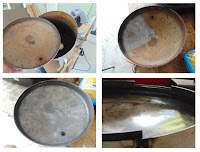
This collage shows the starting look of the tank with the pump fitting on top (pic upper left), with it removed, the standard floor toilet flange (new) and once mounted. (lower right) I did have to modify the bolt pattern a bit in the flange ring to get the standard 6 corner hex pattern. The flange comes with 6 bolt holes but they are not in a true hex shape to allow for toilet bolts. I also had to add an adapter to go from waste pipe sizing to thin wall water pipe. I used a 4" flange, there are 3" available, but with inner diameters, outer diameters and going from thick walled to thin wall pipes the 4" flange worked out for me. I am using 3" thin wall pipe to get the feed from the tank to the chickens.
To be able to fill the tank with the chickens favorite feed, I used a thin blade on an angle grinder to slice the top off. I then de-burred and filed the edges smooth. I then needed to remove the rust and debris out of it. I used the same angle grinder with a wire brush cup attachment. it burned through the rust like it was dusted on rather than etched in. I will remember this tool! Once cleaned, I wiped the surfaces down with acetone to be sure it was clean and applied three coats of a clear top coat to help inhibit the rust then two coats of white spray paint. After the top, I did the inside of the entire tank the same way. I know I will have to do this again in this humid environment, but I figured three coats of clear might give me a good 6 months protection. We'll see.
All parts ready to install! The original tank had 4 mounting feet that I intended to use to mount the unit to the wall. Well, they ended up being too wide for the space so I ground them off and went with plan B. This utilizes the small mounting platform for the motor used to pressurize the water system and it fit in the space like I meant to do it! I did have to modify the bolt pattern a bit to allow the bolt heads through the lower set of slots. I used lag bolts set in 2x4's placed behind the plywood at the hole positions, I didn't want the 150 pounds of feed tearing through the plywood and dumping onto the ground. The last pic shows the tank in place and ready to be plumbed for the feed run.
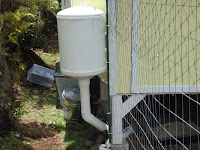
This photo shows plumbing installed and feeding!
I used 45 degree bends in the down run instead of 90's to decrease the chances of feed hanging up in the acute bends. It also allowed me to schmooze the angles and runs of the pipe a little better to get the feeding 'trough' where I wanted it.
I intentionally placed this trough under the coop so they'll have a dry place to get their chow. JoAnn feels any driving rain will get under the coop far enough to get the feed wet so I will place a sheet of acrylic in front the feeder to block and rain but keep the light filtering under.
The 'trough' is an elongated hole in the lower pipe section with a cap on the end. In the three inch pipe, I made the width of the opening about 2 1/2" so the hens can get their heads in without getting rubbed by the edges. I was afraid that the pressure of the feed above would push out ALL the feed, but so far, it seems to be just the right amount.
I started this project since we are not allowing the hens to free range on the property and I didn't want to have to get up as early as they were to feed them, the hens would have at will food throughout the day, and so I can save space and use the hopper as the bulk feed storage. I will make sure to post the number of days a full bin will last but I am thinking a month or more.
Next Post: Rain collection and training the hens to use water nipples
Photo Credits:
All Photos in this post are copyrighted by Air Born Creations and all rights are reserved.


Comments
Post a Comment