Sheep or Goat Feeder
We do more than Chickens here and this project is all about our goats and sheep.
This build takes basic woodworking and basic metalworking skills. If you know
how to weld and use a saw, you can do this. I have a table saw, miter saw,
metal cut off saw, pneumatic tools, drills, sanders etc., but this can be made
with a hand saw, hammer, nails, and a drill.
Design: I started with an image of a shed type of feeder that I found on Google and modified it based on what I felt I wanted for my animals.
1.
Less waste. More feed in the animal is better,
right?
2.
Covered area. We like to eat in the shade, why
not them?
3.
Raised tray. Eating up off the ground means less
chance of parasites.
4.
Holds a full bale. Less feeding time means more
for other things.
5.
Easy loading. Well, because I’m old and getting
lazy.
6.
Cheap. I wanted to use what I had
on hand.
Build:
The plan I came up
with was based on the measurements I had. The internet has a standard bale of hay at
16” tall, 22” wide and 44” long. The one I got at the local Tractor Supply
Store was a bit longer and weighed in at 60 pounds. They call it a 2-string
bale, but mine had 3, no matter, it was the same dimensions but a much looser
pack. Their three string heavy bale is the same dimensions, but weighs in at 120 lbs.
I purposefully avoided using dimensions in this blog because hay bale sizes are totally arbitrary from location to location, please use the heights, widths and depths you need to suit your application and the bales you can find locally.
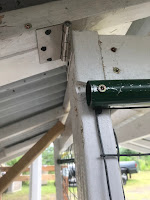
Notice also that I wanted the top to hinge up and out of the way as I loaded
the bale, and since I want to try the heavier and denser bales I also made the
front panel hinged to fall forward for more room and to act as a lever to aid
in swinging the bale up and into the unit.
I built this out of the lumber and metal items I had on hand,
so cost was minimal. 2x4s, 1x2s, 1” EMT, and #3 rebar is what I had, and you
should use what you can find or buy new. Like the dimensions, it’s totally up
to you. None of the materials I used were too old or rusty, just extras from
older projects. Like the roof. I had the roofing laying around from an old
lanai re-roof project we did. When HPM delivered the roofing, they also sent
one sheet of a damaged panel they used to protect our material while
transporting. Thankfully it was a full 10-footer cut into (4) 30” lengths and each
side took 2 of these panels and so the entire roof is the same color.
I painted the wood with two coats to
help stave off the inevitable termite and water damage, but hopefully, it will
last a couple of years. In the drawing I show a 2x4 on the feet of the feeder,
but I haven’t found I needed it yet. The area it is in is level enough that the
weight of the bale keeps the center of gravity low enough to keep the unit from
toppling. It’s even stable with the goats standing and climbing into the little
tray I did make. I left only 8” for head clearance but the rascal goats can
climb on fingernail holds, so I figured it’s going to be what it’s going to be.
The remaining pages are the photos of the build. If you have more specific
questions, feel free to contact me.
This is the base unit. (4) 2x4's and a sheet of ply, notched to fit the uprights. Cut the notches tight to eliminate feed waste.
Roof rafters made from 2x4's ripped to 2x2. Since there is no weight loading for a roof this size in our area 2x2 is economical. If you get heavy snow loads, the roof angle or rafter size (or both) must be adjusted to compensate for it. No sense building it twice, right?
The roof was a single 10
foot metal panel that I cut into 4 equal pieces of 30”, placing 2 of these pieces on each side. This was a little
short at the top leaving a gap but knowing that it would be covered nicely by a standard 6” Ridge roofing cap.
This was the only piece I purchased.
So the build picts are finished, and I thought I took picts of the rebar head
gates, but I cannot seem to find them. You should be able to zoom in on any of
the photos to get a clearer idea of what I did. You can also message me and
ask- I would be happy to help.
The next set of photos is
of me loading the first bale into the feeder.
I raise up the roof and set a pole to prop it open, (this will change soon to a more elegant method)
Flip the front panel down
Roll the bale onto the Head gate and lift it up loading the bale into the unit.
All that's left is to lower the roof and let them in
Currently, the hay is directly contacting the plywood base of the tray because no gap exists. If my experiment shows it may be beneficial, I will adjust the design to include a gap.


Comments
Post a Comment